A student was asking about "sscanf" and how it works for the week 3 ToDo (basicMath challenge), so here is the example:
#include <cstdio>
#include <iostream>
using namespace std;
int main(){
double d;
char num1[80] = "1234.5678";
char num2[80] = "1234.5678a";
char num3[80] = "12a34.5678";
char num4[80] = "a1234.5678";
char ch ;
int ret;
d = 0.0;
ch = 'X';
ret = sscanf(num1,"%lf%c", &d, &ch);
cout<<ret<<endl;
cout<<ch<<endl;
cout<<d<<endl;
cout<<"----------------------------"<<endl;
d = 0.0;
ch = 'X';
ret = sscanf(num2,"%lf%c", &d, &ch);
cout<<ret<<endl;
cout<<ch<<endl;
cout<<d<<endl;
cout<<"----------------------------"<<endl;
d = 0.0;
ch = 'X';
ret = sscanf(num3,"%lf%c", &d, &ch);
cout<<ret<<endl;
cout<<ch<<endl;
cout<<d<<endl;
cout<<"----------------------------"<<endl;
d = 0.0;
ch = 'X';
ret = sscanf(num4,"%lf%c", &d, &ch);
cout<<ret<<endl;
cout<<ch<<endl;
cout<<d<<endl;
cout<<"----------------------------"<<endl;
return 0;
}
output:
1
X
1234.57
----------------------------
2
a
1234.57
----------------------------
2
a
12
----------------------------
0
X
0
----------------------------
Friday, September 27, 2013
Friday, July 12, 2013
Zotac - H55-ITX WIFI HDMI Audio
Installing windows 7 on my Zotac H55-ITX WIFI miniboard, I noticed that there is no sound through HDMI port.
First make sure you have the latest driver for you intel graphics from Zotac downloads then restart the computer and go to BIOS settings (hit DELETE when computer boots up).
Under "the southbridge settings" make sure "internal HDMI" is "Enabled".
Login to windows, right click on computer and select Mange. Under the computer management list select "Device Manager"
Now under "Sound, video and game controllers" you should have a "High definition audio...." device added.
Right click on it and select update driver and choose to browse your computer for the driver.
From the Graphics driver you just downloaded select the directory "ibxHDMI" which contains "IntcDAud.inf" file and click ok.
This will install the correct driver fro you "Intel Display Audio Device". (make sure in "Playback devices" you have your HDMI device selected as default.
Enjoy....
Friday, September 28, 2012
Popcorn maker to be used for editing Big Blue Button recordings
Big Blue Button uses popcorn.js to do a synchronized playback of meeting recordings. This includes audio/video/slides/chat and whiteboard.
I've been asked several times if the recording of Big Blue Button sessions can be edited. And my answer was "soon"! Well, last week in Mozilla Ignite Hackanooga , David Seifried created a prototype that uses popcorn maker to do exactly that!
Here is the video, take a look!
Video of editing a BigBlueButton recording using Popcorn Maker
Monday, June 18, 2012
Opening Ports on Windows 7, to access NAT BBB Virtual Machine from LAN
If you have set your Big Blue Button server Virtual machine to use NAT and you need to give others access to your Virtual Big Blue Button server on your windows 7 machine, ports 80, 1935, 9123 should be opened. To do this open "Control Panel\System and Security\Windows Firewall".
click on "Advanced Settings" on the left panel menu and then right click on "Inbound Rules" and click on "New Rule".:

In New Inbound Rule select "Port" and click on next and enter the specific ports: (80, 1935, 9123).

Then click on "Name" and enter a name for this rule (in this case "BBB" would make sense) and click on "Finish".

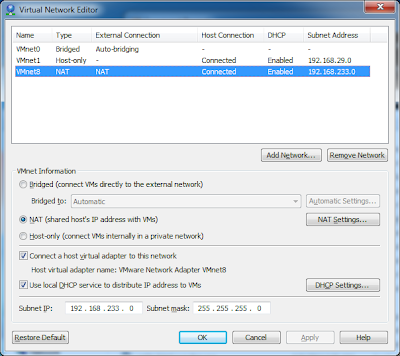
VMware Player and Custom NAT port map settings
For my BBB Virtual machine on Windows 7, I need to have NAT settings with custom port mapping. VMPlayer does not have the "vmnetcfg" program extracted at install time, so custom NAT settings are not possible.
To manually extract the "vmnetcfg" configuration program, after installation, re-execute the VMPlayer steup program as:
Drive:> VMware-player-?.?.?-??????.exe /e .\VMTools
This will extract the all the installation files into "VMTools" directory. One of the extracted files is a cabinet file called "network.cab", which contains "vmnetcfg.exe". Open "network.cab" (as a folder) and copy "vmnetcfg.exe" and paste it into the installation root of "VMPlayer"; (usually: "C:\Program Files\VMware\VMware Player")
Run "vmnetcfg.exe" and this will give you full access to detailed network settings of all your virtual machines:
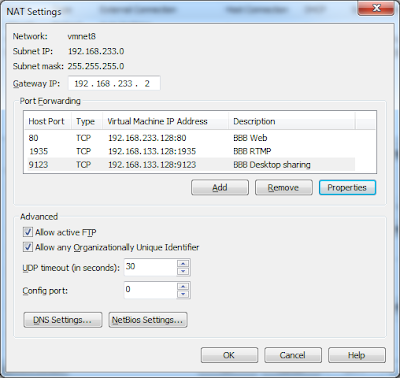
Click on NAT settings and you get:

Tuesday, May 29, 2012
Big Blue Button Test Server is up!
Big Blue Button (BBB) test server in Seneca is up. Please spread the word and let Senecans use it and give us feed back.
The URL for the server is https://bbb.senecac.on.ca
You can read about BBB at Seneca CDOT Wiki and also at bigbluebutton.org
Please note that this is a test server, therefore the SSL certificate is self-signed, so if you get a warning, it is normal! Also, the server may go through update, builds and so on; so although we ask and encourage you to use it, make sure you don't rely on it as your only solution for lectures and conferences (always have a backup plan),
And again contact the contributors for any concern, suggestion, etc...
Thanks Javascript!!!
After having problem detecting a secure connection in Nginx/Tomcat, I did an easy work-around using java script!!!:
<script type="text/javascript">
if (window.location.protocol != "https:") {
window.location = '<%=SecureLandingURL%>';
}
</script>
<script type="text/javascript">
if (window.location.protocol != "https:") {
window.location = '<%=SecureLandingURL%>';
}
</script>
Subscribe to:
Posts (Atom)